


Mystere Curio Kit / Part 1:
"Creating Your Vessel"
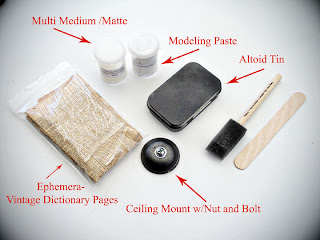
Gather the following supplies from your kit or studio:
-Metal Top Hinged Tin (Altoid Tin)
-Ceiling Mount with nut and bolt
-Foam Brushes
-Ephemera- Vintage Dictionary Sheet
-Modeling Paste
-Matte Multi-Medium
-Black Acrylic Paint
-Black Acrylic Paint
We
will begin with the Metal Top Hinged Tin.

We
spray painted the tins found in our kits to
help create texture, shadow and bite.
help create texture, shadow and bite.
When using your own tin or if the one you got from us
has a few scratches or markings, don’t worry about a perfect
spray paint job. We are going to build several layers on this tin.
has a few scratches or markings, don’t worry about a perfect
spray paint job. We are going to build several layers on this tin.
If you are using pieces from our kit you will notice that we have
created two holes of various sizes.
These
will help you in adding elements at different stages.
If you are using your own tin you can drill your own holes,
or use a strong adhesive to help add elements.

What we will do next is remove the hinged lid.
To do so, just bend the lid back the opposite way.
If you are using your own tin you can drill your own holes,
or use a strong adhesive to help add elements.
What we will do next is remove the hinged lid.
To do so, just bend the lid back the opposite way.
This
will cause the metal fold hinges to release.
Then pull the top lid off and save for another project.

Then pull the top lid off and save for another project.
Push
the fold hinges back into the side of your tin
to cover the gaps created by removing the top.
to cover the gaps created by removing the top.

Now it’s time to add some texture and color inside of your tin.

You
will first coat the back panel of the inside of
your tin using the multi-medium.

your tin using the multi-medium.
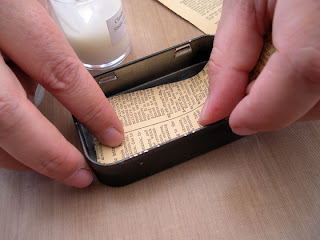
Then
you can coat a layer of multi-medium on top of the first layer.

Adding
more medium and pages as needed.
Also work the inside panels of your tin.

When
working with your ephemera feel free to center
your
text, put it in tilted, apply big pieces, or various small pieces.
It’s
about your preference.
Once
completed remember to clear the hole in the backside.
Use
the silver smaller bolt from your kit to do this.

Once
dry we will attach the base to your tin.
You
will do this with your ceiling mount, large nut and bolt.
If you are doing this without our kit you may use a strong adhesive.
If you cannot find a ceiling mount.
A mason jar lid works as a fine substitute. 
Be
sure to center your piece before you tighten the nut all the way.

You
are now done with Part 1. You now have a free standing vessel!

Part 2 & more coming soon.
Very soon.
All the best,
- Jack & Cat Curio


3 comments:
You're amazing! Great tutorial with fantastic pictures. Thanks so much, must try this!
~Linda
Thanks you so much for the tutorial...I've wanted to create one of these for so long! Super excited...TFS!
What a tease...heehee..Big Hugs,Cat
Post a Comment